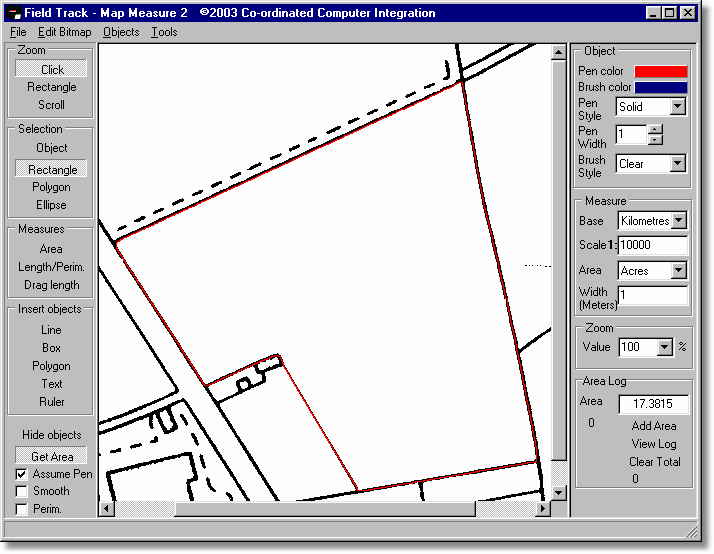
"Professional" users of Field Track have an integrated map measuring tool, which can use any type of image file from which to measure distances and areas. The "Map Measure" system can also take images from your field, or application picture database.
Menus
File
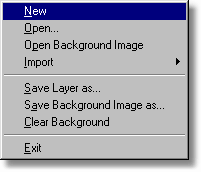
New
Clears the picture and any mapping objects for a fresh start.
Open
'Field Track - Map Measure' uses a two layer imaging system; the background image and a vector drawing layer. This option allows you to open a previously saved top vector layer.
Open Background Image
'Field Track - Map Measure' uses a two layer imaging system; the background image and a vector drawing layer. This option allows you to open a background image - a scanned map, for example.
Import
Import DXF vector objects.
Save Layer as...
'Field Track - Map Measure' uses a two layer imaging system; the background image and a vector drawing layer. This option allows you to save the current top vector layer to file for later use.
Save Background Image as...
'Field Track - Map Measure' uses a two layer imaging system; the background image and a vector drawing layer. This option allows you save the background image to file.
Clear Background
Clears the background image but leaves any mapping objects.
Objects
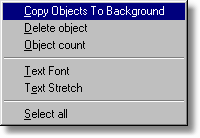
Copy Objects To Background
This option copies all vector objects on the top vector drawing layer and fixes them onto the background image, for later saving as a new map image.
Delete object
Delete selected object
Object count
Number of objects on vector layer.
Tools
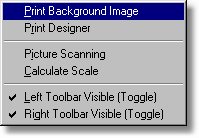
Print Background Image
This prints off the background map to your printer. Top layer vector objects are not included, unless you first use the above "Copy Objects To background" menu option.
Picture Scanning
This feature allows you to directly load scans from your scanner. Images scanned in here need to be saved as picture/image files for mapping purposes, which can then be loaded in as background maps. It is recommended you save images as Windows® Bitmap (*.bmp) files. Images loaded, or scanned can be cropped using the mouse interaction dropdown menu. Once you are happy with your crop settings, pressing the traffic signal button crops the image to your settings. This image can then be saved for later use. Cropping an image makes the image smaller by discarding other elements of the image and gives you a smaller map from a large one.
Left & Right Toolbars
You can toggle the left and right panels visible, or invisible to give you more map area on screen.
Calculate Scale
To use this tool, Field Track Map Measure alters your "Base" unit to meters and expects you to use the "Selection", "Polygon", or "Rectangle" tool with "Measure", "Length/Perim" feature to draw a single line polygon between two points; i.e., click on first point, move mouse to final point and double click. With distance line created, select the "Calculate Scale" menu option and enter the distance between the points in meters. For example a 1000 meter single-line polygon, or a 4000 meter rectangle. Field Track Map Measure will re-adjust your scale to suit the line/rectangle length and the distance you entered.
Tool Bars
Left
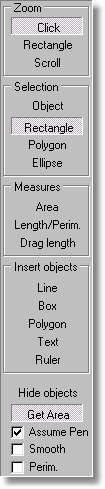
Zoom
You can select different types of zoom features. If you want to zoom in on a specific area, use "Rectangle" and draw out a square which covers the area of the map you wish to view closely.
Selection
Use this tool to draw several types of selection areas. Use "Rectangle" to draw a square covering the area you wish and then you can use the "Crop" menu option to create a background image only of that area, thus making your image files smaller and of single fields.
Measures
Gives you several possible methods to measure an area.
| · | Area
|
| This allows you to measure the area of an object.
|
|
|
| · | Length/Perim.
|
| Using your "Measure" settings will calculate the distance along the outside of the object you are drawing. Hectares and Acres using the "Width" setting can be calculated along the distance of the outside of the object you are drawing.
|
|
|
| · | Drag Length
|
| Click and hold the mouse button down while you drag the mouse around the image. A distance, or area will be displayed between where you clicked the mouse and its current position.
|
Insert Objects
'Field Track - Map Measure' will allow you to insert vector objects onto the top vector layer. These can then be copied to the background image and saved, or saved as a vector layer for later use. All these functions use the "Object" group to define pen colour, size and fill.
Line
Draws a straight line between two points. Points can be moved.
Box
Draws a rectangle. Points can be later moved.
Ellipse
Creates an ellipse around a central point.
Text
Allows you to enter text into a text box.
Ruler
Using the Base Unit (either kilometres, or meters) places a line between two points and enters the distance along its length in either meters, or kilometres.
Get Area
Setting this switch on will allow you to click on the inside of a completely closed 'field'/area and Field Track will draw around the field creating a Polygon vector object and also tell you the area measurement depending on your "Measures" setting.
Right
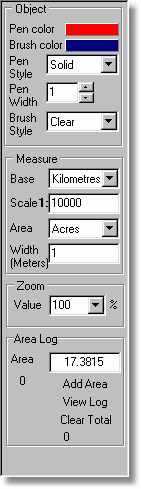
Object
'Field Track - Map Measure' will allow you to insert vector objects onto the top vector layer. These can then be copied to the background image and saved, or saved as a vector layer for later use. All these functions define how the object is drawn.
Pen Colour
The colour of the pen
Brush Colour
The colour of the brush of a fill.
Pen Style
A select of pen styles.
Pen Width
The pixel point width of the pen.
Brush Style
This style of the brush fill.
Measure
'Field Track - Map Measure' will use either two base units of measure and from this convert areas and distances to the selected "Area Measure".
Base (Unit)
This is the base unit measure 'Field Track - Map Measure' uses as the base calculation.
Scale
This is the scale you wish to work with. If you load a 1:10,000 map, your scale needs to be "10000", so that 'Field Track - Map Measure' knows how to calculate area and distance. "10000" is the default.
Area (Unit)
A selection of areas and distances which reflect the results of your measurement selection.
If you are measuring an area, then all results are for an area. For example, the base unit is Kilometres and the area unit is also kilometres means an area will read as kilometres squared.
If you are measuring a distance, or perimeter the results will be the length of the outside of the object you draw. If you select a length and use an "Area Unit" of "hectares", or "Acres", 'Field Track - Map Measure' will use the "Width" reading to calculate an area the width of "Width" around the outside, or along the length of the object you draw.
Width (Meter)
This is for use with "Length/Perim" and an "Area Unit" of either "Hectares", or "Acres".
Tricks & Tips
Once you have loaded in your 1:10,000 map scan/picture, select "Click" and "Scroll" to quickly zoom out and move around the map with the left and right mouse buttons.
Getting An Area
To trace around an area, use "Polygon" under the "Selection" group. Click the left mouse button once at the first point and then move the mouse to the second point. 'Field Track - Map Measure' will draw a line from the first point to the mouse cursor. Use this to follow the boundary line/mark. When you are happy with the second point, click the left mouse button again. Continue this approach until you are happy you are coming to your final point (where you started with the first point). When you are over the last point double click the left mouse point and 'Field Track - Map Measure' will complete the polygon and give you the completed area measurement based on your "Area" selection. 'Field Track - Map Measure' will make sure that the final point meets the first point on the final double click of the mouse. With the polygon complete, you can change the area measurements, or even change from "Area" to "Length/Perim" and work out distance, or area along the perimeter. If you change area measures, the area readout will only update if you move the mouse over the area, or map.
Using "Get Area"
Set your area measurement, switch this feature on and then click inside the field you wish to measure. As long as the background image has the field completely enclosed 'Field Track - Map Measure' will attempt to draw around the field and give you a resulting measurement.
With your area object drawn, clear the back ground image and then copy the object to your new, clear, background image. Delete the area object and you now have an image of your field for later use. Remember to save this new background image.
Accuracy
Accuracy is as good as the core scanned map/image and your abilities to draw around an object, not to mention you telling 'Field Track - Map Measure' the correct scale of the map/image.
Buffer Zone/Wildlife Boundaries
Use the "Width", "Length/Perim", with "Area Unit" to calculate areas around, or along a boundary. Deduct this from the field area to get a new field area.
Measure A Line
To measure a line select "Length/Perim", left click the starting point and then move the mouse to the final point and double click the left mouse button.
Calculate The Area Of One 'Round' With The Sprayer
To calculate the area of one 'round' with the sprayer use "Width", "Length/Perim", with "Area Unit", left click your starting point, move the mouse to the other end of the field, left click again and then move the mouse to the starting point and double-click the left mouse button.
Use The "Ruler" To Mark Out Distances
Use the "Ruler" to mark out distances. Select the "Base (Unit)" as "Meters" and then select the "Ruler" object. Once you have placed a Ruler object on the top layer, select "Object" on the right panel and you will be able to move the ruler around the map and alter it's starting and finish points.